Thursday, May 31, 2007

We've got a hot one tonight!

Inspired by the weather, I decided to have a go at homemade frozen yogurt. So first I looked at the Cook's Illustrated recipe for strawberry yogurt, and also at David Lebovitz's vanilla yogurt recipe from The Perfect Scoop. Since all the food bloggers (including me) worship the ground he walks on, I decided to trust David Lebovitz more than Cook's Illustrated and adapted the recipe to make strawberry-banana. And David did not dissapoint. He never does.

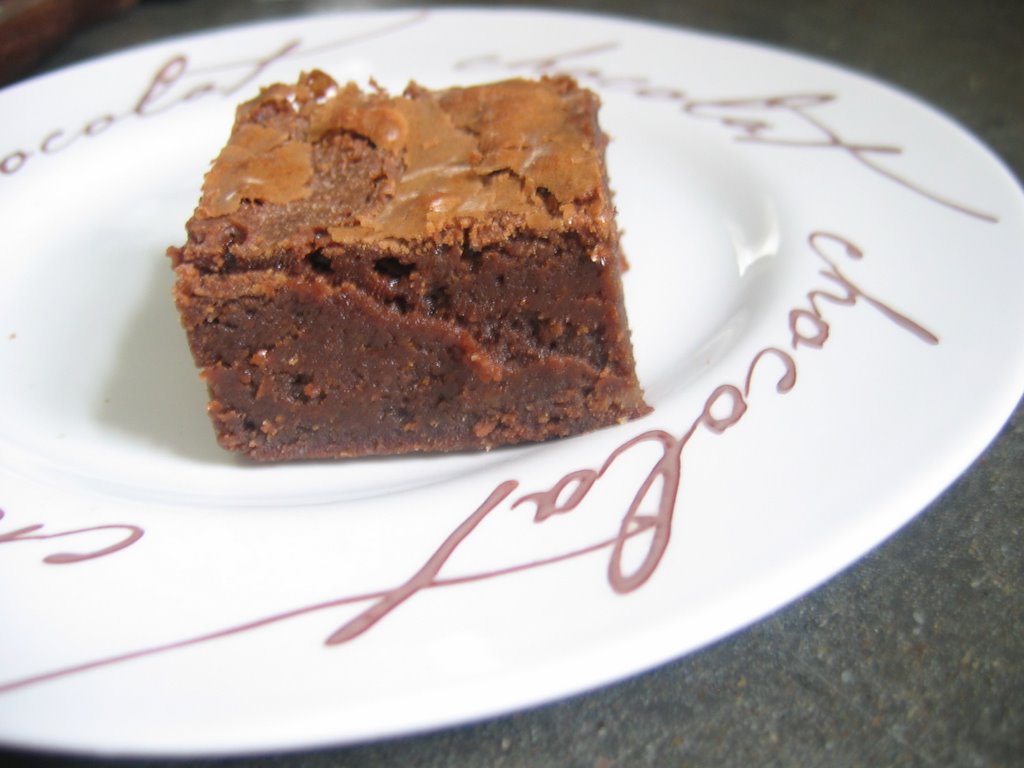
This beautiful and thick frozen yogurt was sweet, tangy, and so rich even I could only handle a small bowl. That's saying something.

The banana really added to the creaminess, and balanced the tartness of the strawberries and yogurt. I only added one banana, and it was barely detectable. Next time I will add 2.

It is a really simple recipe, but you do have to think ahead because draining the yogurt takes 6 hours. Plus, if your ice cream maker is like mine then you need to freeze the canister for 24 hours. Then, once the yogurt is made, I like the texture best after it has solidified in the canister in the freezer for about 3 hours.


It sounds so complicated, but its really not so here is the recipe:

3 C drained plain yogurt (start out with 5 or 6 C of yogurt, it
drains down to 3. drain for about 6 hours in a mesh strainer, maybe lined with
cheesecloth. After draining, it will look thick, as in picture.)
3/4
C sugar
10 large Strawberries, cold & sliced
2 ripe bananas,
refrigerated
(I used 1, but I wish I had used 2)

Mix drained
yogurt with 1/2 cup of sugar and let sit for 1 hour.

Mix 1/4 C sugar
with sliced strawberries and mash a little with a potato masher. Let stand for a
few minutes and then stick the berries in the freezer for about 15 minutes or
until the juice is starting to freeze so they are nice and cold.

Mash
banana with a fork and place in the freezer until you use them, to make sure
they are cold.

Stir yogurt again and make sure sugar is dissolved, then
add it to your ice cream machine (If your machine is like mine, then you'll need
to add it after its already churning).

I added the fruit after the
yogurt churned for a few minutes, but the yogurt is so thick I think it would be
fine to add it from the beginning. Now freeze according to the ice cream machine
directions.

Serve it as soon as its done churning if you like it extra
soft, or freeze it for a few hours to let it firm a bit. Enjoy!


Posted by Picasa

Wednesday, May 30, 2007

The New Old Standby

This is my new standard chicken salad recipe. It is available at wholefoods.com , along with a plethora of other recipes. It's a handy resource, too, because the recipes come with the nutritional information (if you're into that. But for this recipe, don't be).

I am without words to describe the tastiness of this salad. The dressing is just right- tangy, with a hint of honey. The celery and pecans add crunch and the grapes (you MUST add the grapes or substitute apples) are essential to the fresh, sweet taste of the salad. Ryan was raving about it- and he's not usually one for chicken salad. I left the celery out of the pictured batch, and it was just as good (or better, in Ryan's opinion). Also, I used canned chicken, which made this salad a cinch to put together. Let the flavors mingle overnight before serving.

Dressing
1 cup mayonnaise
4 tsp apple cider vinegar
5 tsp honey
2 tsp poppy seeds
sea salt, to taste
ground pepper, to taste Salad
2 lb boneless, skinless chicken breasts
3/4 cup pecan pieces, toasted
2 cups red seedless grapes
3 stalks celery, thinly sliced

Prepare the dressing by thoroughly mixing together all dressing ingredients in a bowl. Refrigerate until ready to dress the salad. (Can be prepared up to 2 days
ahead.)


Preheat oven to 375°F. Place the chicken breasts in one layer in a
baking dish with 1/2 cup water. Cover with foil and bake 25 minutes until
completely cooked through. Remove cooked chicken breasts from baking pan, cool at room temperature for 10 minutes, then cover and refrigerate.

When the breasts are completely chilled (at least 2 hours refrigerated), dice into
bite-sized pieces and transfer to a large bowl. Stir in pecans, grapes, celery
and dressing.

Posted by Picasa

Monday, May 14, 2007

Wild Rice Chicken Salad

"Tuna salad, chicken salad, macaroni salad? Who the hell cares! It's all just another word for 'mayonnaise'!"
-Roseanne*


I love all kinds of salads. If I had to choose one food to eat for every meal, it would probably some sort of chicken salad. Mixtures and assortments of foods are delicious, especially when bound by some sort of deliciously high-calorie dressing, be it mayonnaise or not.

This is a new recipe for Chicken Rice Salad that I acquired from Sara at our enrichment recipe swap. Last month's topic was salad, and everybody raved about this one. I think it is pretty flexible, as you could add any leftover vegetable odds and ends or really anything else that strikes your fancy. You could substitute the regular peas for snow peas. Make it without the chicken if you want to. BUT I wouldn't swap out the avocados or the chopped pecans, as they balance a very acidic dressing. When I made it at home, I didn't really follow the measurements for the vegetables and I served it in a pita (though it was also delicious on its own).

* If I remember correctly, this show was forbidden in my house. Somehow I watched it anyway. Sorry Mom. I guess you found the Roseanne family trashy and offensive, but somehow I have remembered this quote for years because to me, it was offensive. How could she insult some of my favorite salads like that? And also, is she right? Because if she is, that means I like mayonnaise a whole lot more than I thought. I'm not a food snob or anything, but that is so trashy.


Chicken and Wild Rice Salad

2 Packets of wild rice mix, prepared according to directions
(the packets I used contained about 2 or 3 servings each)
juice of 1 small
lemon
3 chicken breasts, cooked and diced

4 chopped green onions
3 oz snow peas
1 diced red pepper
2 avocados
1 C chopped pecans

Dressing:
2 cloves garlic, crushed
1 T dijon mustard
1/2 t
salt
1/4 t black pepper
1/3 cup olive oil
1/3 C rice wine vinegar

stir the rice, chicken, vegetables, and pecans together. Add some of the
lemon, but not all as you will add the rest to taste later on. Emulsify dressing
ingredients in a food processor or blender and stir about half of the dressing
into the salad and taste. Add more to taste and allow salad to sit overnight to
allow flavors to mellow and blend. Keep the dressing and lemon juice- you might
want to add more tomorrow.
Posted by Picasa

Thursday, April 26, 2007

Mrs. Dart's Lemon Bars of Enlightenment
I have had these lemon bars twice and both times they have schooled me. First I had them when the lovely Mrs. Dart, my mother-in-law, made them. That is when I learned that lemon bars can be downright addicting. Before that day, I actually thought I disliked lemon bars. These babies could change anybody's mind.

Now for the second bit of wisdom imparted from these luscious bars: I learned that my oven is really unneven. Notice the bar in the back, left side of this picture has almost no lemony filling, but the bar in front has an abundance of filling. Watch out for oven uneveness, because the extra lemony ones can be tart enough to give one a sore throat when one inhales 3 at a time in a response to hunger so strong it could only be church-induced.

Here's the recipe. Make it sometime, you might learn something.

Lemon Bars of Enlightenment

Crust:
1 C Butter (I softened it, and that
seemed to work)
2 C flour
1/2 C powdered sugar
dash of salt

Mix.
It will be crumbly. Press lightly into 9 x 13-inch pan. Bake at 350 degrees for
10-15 minutes and cool slightly. Don't turn off the oven
yet.

Filling:
4 beaten eggs
6 T fresh lemon juice
2 C sugar and
1/4 C flour stirred together

Stir all the filling ingredients together
and pour over pre-baked crust. Bake all together at 350 for 25 minutes.
Optional: dust with powdered sugar.
Posted by Picasa

Monday, April 23, 2007

Real Gluttons Eat Pie for Dinner
This is another item I made for the Register's farewell fete.

Need an easy and delicious idea for dinner? A substantial appetizer for a party? Don't know what to feed your vegetarian friends (not vegans)? Do your arteries need clogging? A tomato-basil tart is appropriate for almost any occasion.

This one is especially easy because it is made with store-bought pie crusts. It is especially delicious because it includes 2 Cups of mozzerella cheese in addition to tomatoes and basil.

I made two versions: one in this pie dish, and another in a 10-inch springform pan. I actually prefer the latter, now that I have tried it, because the crust looked kind of pizza-like instead of so pie-like in the pie dish. It actually looked elegant with the tomatoes piled high inside. Yum!


Tomato-Basil Tart
1/2 (15-oz) package refrigerated pie crusts
2 C shredded mozzerella cheese
4 T fresh basil, divided
3 large ripe tomatoes, sliced
1 T olive oil
1/4 t salt
1/4 t fresh ground pepper

preheat oven to 400 degrees farenheit.

Place crust in 10-inch pie pan or springform pan and prick the bottom and sides with a fork. Bake crust for 5 minutes.

Sprinkle cheese over crust and top with 3 T basil. Arrange tomato slices on top and brush with olive oil. Sprinkle with salt and pepper.

Bake for 35 minutes. Top with remaining fresh basil and let stand for 5 minutes before serving.

Posted by Picasa

Tuesday, April 17, 2007

Achtung. Because somebody told me that means "caution" in German.

Oops. I looked it up and Babelfish disagrees with that translation, so maybe a German can let us know.


I'd been waiting for an excuse to bake this. This is a very dangerous cake to have just sitting around your fridge begging you to eat it and with no one there to help you finish it off. That's why I say achtung. Better have a group of 15 or so people to help you out. I thought a going-away party for the Registers was the perfect reason for some serious flourless chocolate cake.

And serious it was. It was like eating a truffly (but so much better because a slice of cake it so much more fit for this girls chocolate cravings than a couple of measly truffles). It was the smoothest, silkiest flourless chocolate cake I have ever eaten. Maybe that has something to do with the the 3 (!) sticks of butter in one 9-inch cake. Maybe.

I did not have the time to take a picture of the whole cake, but it was coated with a beautiful, smooth ganache that made it look so elegant. After everybody left the party, there was just this one little peice left. And I saved it for you. Ryan wanted it but I saved it for you.

Smooth Operator Intense Chocolate Cake
Adapted from "Chocolate Intensity" in Tish Boyle's The Cake Book

Makes one 9-inch cake
8 ounces bittersweet chocolate (I used around 70% cacao), finely chopped
12 ounces (3 sticks) unsalted butter, cut into pieces
1 cup granulated sugar
1/2 cup whole milk
6 large eggs
1 tsp vanilla extract
1/8 tsp salt

Preheat oven to 350ยบ F. Butter the bottom and sides of a 9-inch round cake pan. Line the bottom with a parchment round and butter the parchment. (If you're using a pan with a removable bottom like a springform, make sure to wrap the pan with 2 or 3 layers of foil, so water from the water bath can't get inside the pan)

Place chopped chocolate in a large bowl. In a saucepan over medium-high heat, stir butter, sugar and milk until the butter is melted and mixture has just started boiling.

Pour the hot mixture over your chopped chocolate. Let stand for 1 minute then gently stir until chocolate is melted and the mixture is smooth.

In a medium bowl, whisk the eggs vigorously until blended. Whisk in the vanilla and salt. Slowly add about 3/4 cup hot chocolate mixture to the eggs, whisking constantly. (Tempering the eggs with a little bit of the hot chocolate mixture will prevent "scrambled eggs" when combining the two mixtures.) Add the egg mixture to the hot chocolate mixture and whisk to combine well.

Strain the batter through a sieve (to catch any cooked egg bits- I skipped this part, because I thought my batter looked quite free of scrambled eggs but then I detected one or two teeny egg bits in my slice of cake) and then pour batter into prepared pan.

Set cake pan in a large roasting pan and fill the pan with enough hot water to come halfway up the sides of the cake pan. Bake for 35-45 minutes, until the center is shiny and set but still a bit jiggly.

Transfer cake pan to a cooling rack and cool for 20 minutes. Run a thin knife around the edge of the pan to loosen the cake. Place a cardboard round on top of the pan and invert the cake onto it. Remove pan and carefully remove the parchment paper. Refrigerate the cake for at least 2 hours before glazing with chocolate glaze.

Bittersweet Ganache
6 ounces bittersweet chocolate, finely chopped
2/3 cup heavy whipping cream
1 tsp vanilla extract

Place chopped chocolate in a medium bowl.In a small saucepan, bring the cream to a boil. Remove pan from heat and add the chopped chocolate. Let stand for 1 minute then gently stir until chocolate is melted and the glaze is smooth. Gently stir in the vanilla.

Transfer glaze to a small bowl and cover the surface of the glaze with plastic wrap and let cool for 5 minutes at room temperature before using.

To glaze the cake:Place the chilled cake, still on the cake round, on a wire rack set over a baking sheet. Slowly pour the hot glaze onto the center of the cake. Smooth the glaze over the top and sides, letting the excess drip onto the baking sheet.Scrape the extra glaze from the baking sheet and put it in a small ziploc bag. Seal the bag and cut a tiny hole in one of the bottom corners. Gently squeeze the bag over the top of the cake to drizzle the glaze in a decorative pattern. Refrigerate the cake at least one hour before serving.


Monday, April 09, 2007

C is for Cookie, that's good enough for me
When Pennsylvania finally started to defrost a couple of weeks ago, I had the desire to come out of hibernation and maybe visit the neighbors, assuming they still lived next door. That was anybody's guess since I hadn't seen them in 3 months. Of course, I put off making the cookies until we saw snow again. Anywho, I made a new sugar cookie recipe this weekend. They were delicious and buttery, almost like shortbread cookies.

Ryan couldn't stop eating them before I frosted them, but then we liked them even better when we put almond-flavored frosting on top (pink and yellow, to celebrate "spring").

I forgot to take pictures of the final product, but I did take pictures of the dough, which was strangely mealy until I pressed it together into a ball. I guess that's how it is supposed to be.Thanks to elise at
Simply Recipes, since I stole this recipe from her post that you can read right here. (note: yields 5 dozen cookies??! I scarcely got 2 dozen. what is wrong with me?)
Posted by Picasa
Sugar Cookie Recipe number one

Cookies:
3 cups flour
1 cup granulated sugar
1 1/2 tsp baking powder
1/2 tsp salt
1 cup soft butter
1 egg, slightly beaten
3 tbsp cream
1 tsp vanilla
Icing
1/3 cup of softened butter
1 pound of confectioners sugar
About 1/4 cup of milk
Almond extract, to taste (1 tsp-
ish)
1 Sift dry ingredients (use a real sifter), cut in butter and
add other ingredients. Blend thoroughly; chill for several hours.
2 Break
off a piece of dough the size of an orange and pat it flat in your hand. Using a
rolling pin, roll on dough on floured board (best to use a 2/1 ration of
flour/sugar - 4 Tbsp flour mixed with 2 Tbsp sugar) or between wax paper. (It
helps if you flour both sides of the dought.) Roll out to about a 1/4 inch
thickness. Cut out and put on
silpat-lined or ungreased
cookie sheet. Bake 5-8 minutes at 400 F. Remove the cookies from the oven as
soon as you see them turning color at the base of the cookie. Let cool
completely.
3 Mix icing ingredients together until smooth. Separate into
different bowls, add food coloring to achieve various colors. Spread on cookies
with a butter knife, use cake decorating piping equipment to add decorative
accents. If you want the sprinkle type decorating candies to stick, brush the
cookie with clear Karo syrup and then sprinkle.
Makes
Scarcely 2 Dozen Cookies

Monday, March 12, 2007


THE Cheesecake would probably have been the perfect cheesecake if only I had made it perfectly. I decided to take advantage of this girl's quest for the perfect cheesecake. I, too, would like to eat perfect cheesecake. She was scientific about it in a way I wish I was, but I will never be, so I just decided to take her word for it that THE Cheesecake is what we have been searching for. Thanks for doing the brainwork, Kitarra! Whoever you are!

I love that this cheesecake has no crust because it allows the velvety texture to shine. And was it ever velvety. It was practically winter formal wear. It was just the right density- dense but not dry. The taste was also very nice and tangy with just a hint of lemon.

If you make it- be sure to get your springform pan water tight (via directions in the recipe) I didn't do a good job and some water leaked into the cake, so some spots on the bottom were not velvety like they should have been. Also- you might want an oven thermometer if your oven (like mine) doesn't have 200 degrees on the dial. This can also create some texture issues.

Before I link to the recipe, here's my take on a hard-to-find ingredient, and also a warning on the time consumption of baking this cake. She calls for kifir cheese or labnan, a type of cheese. In my searching I discovered that they are more commonly spelled "kefir" or "labne". You can make the cheese if you buy your own kefir, or you can use her suggested substitution, drained greek yogurt. That is what I did. I don't know what the difference is between greek yogurt and regular old plain yogurt. It tasted like it was full-fat and thicker than your average american-made yogurt. I think you could easily and undetectably substitue sour cream.

Finally- read the baking directions before you decide to start making this at, say, 9 o'clock at night (start at 500 degrees for 15 minutes, turn oven down to 200 degrees for an hour, loosen the cake, bake again for an hour, turn up the heat again....) Consider yourself warned.

Without further ado, here's the link to the recipe, plus the creator's novel of comments about her quest.

Wednesday, March 07, 2007

Very Bitter Greens
Is it not true that certain plants are bitter tasting as a warning that they are actually poisonous?

If so, then I don't know how on earth broccoli raab came to be acceptable for human consumption.

Broccoli Raab is actually pronounced like "broccoli rob". It is also called broccoli rabe or rapini. Last night I made broccoli raab with sausage and grapes.

Somebody must like it, but Ryan and I couldn't even eat our dinner so I am not posting the recipe. Maybe we just aren't the healthy vegetable-lovin type. Rachel, if you want this recipe, then email me.
Posted by Picasa

Saturday, March 03, 2007

TURNIP THE HEAT, IT'S COLD IN HERE

In an effort to mature my palatte, I have decided to incorporate vegetables that I have never tasted, prepared, and/or never enjoyed into our dinners. Feel free to join me in my adventures, or send recipes you love for vegetables that are generally less-loved.

First up: turnips. So ordinary, but I have never tried them. Plus: they are available at the pathetic produce section of my most local grocer.

I made these pureed. No exact recipe is needed. That is, if you know how to make mashed potatoes. In fact, for thickness, throw a potato or two in with the turnips. I used 2 turnips and one potato.

Peel and cut the potato and turnips into cubes. Boil them (in a pot of boiling water, of course) until the turnips are very soft. They take longer than potatoes alone- about 20 minutes total. Then drain the potato and turnips and puree them with a bit of butter, salt, and pepper. No milk is needed because they should be thin enough.

MY VERDICT: Turnips do nothing for me a potato can't do better. Not bad, though.Here's to an effort towards a well-rounded palette.

Join me next time for adventures with broccoli rabe!
Posted by Picasa

Monday, February 19, 2007

Sweet Seduction
Sugar High Friday #28

There is nothing in my house that is more seductive than these molten chocolate cakes.

I will keep this short because my words pale in comparison with the deliciousness of molten cakes.

In short, here is a link to the recipe. My advice is to use the best chocolate you can afford. I like 70% cacao for these cakes. They are best topped with ice cream or whipped cream and, most importantly, rasberries.

Posted by Picasa

Monday, January 29, 2007


Ryan’s Sweet Buns
Caramel Rolls, Sticky Buns, call them what you will but I will call them “Ryan’s Sweet Buns” because Ryan really enjoyed having these for breakfast every morning last week.

These rolls remind me of the pecan rolls from Cinnabon. They are baked in a shallow bath of caramel sauce and pecans, which makes for one deliciously gooey roll. I doubled the caramel sauce in the recipe below, because I thought they would be even better that way, though they were pretty good the way I made them originally, too. Total active time in the kitchen was only about 20 minutes and the machine does the rest.

I am not a bread snob, and I am happy to have a machine that knows just when and how much to knead the bread. I love my bread machine. I highly recommend them, and Bread Machine Magic by Linda Rehberg and Lois Conway.

The dough I used for these rolls was SO easy to work with.. No overworked, tough rolls here. I am usually terrible at rolling it out with only a few swipes of a rolling pin, but with this recipe it was a snap They were delightful and light, especially right out of the oven.


Ryan’s Sweet Buns
Adapted from “Basic Buttermilk Sweet Dough” from Bread Machine Magic by Linda Rehberg & Lois Conway and “Cinnamon Rolls” by Cathy Nowell on Allrecipes.com

For 1 ½ lb bread machine
7/8 C buttermilk (or 3 T buttermilk powder with 7/8 C water)
1 egg
3 C all-purpose flour
1 t salt
4 T butter
¼ C sugar
¼ t baking soda
2 ½ t fleischman’s active dry yeast or 1 ½ t Red Star brand (there are about 2 ¼ t in a ¼ oz packet of yeast)

2/3 C butter
1 C brown sugar
1 C vanilla ice cream
1 C pecans (optional)
½ C butter, softened
1 T cinnamon
½ C brown sugar

place all ingredients in bread pan, select Dough setting, and press Start.

As dough is being made, melt 2/3 C butter in a small saucepan. Add 1 C brown sugar and 1 C ice cream; bring to a boil and cook for 1 minute. Pour into 9x13 inch pan. Spread Pecans over caramel, if desired

When the dough has risen long enough, the machine will beep. Turn off machine and turn out dough onto floured countertop. Roll out and spread or dot with ½ C butter. Sprinkle 1 T cinmamon and ½ C brown sugar on the top. Roll it up and seal the edge. Cut into 12 rolls, and place in prepared pan of caramel. Allow to rise until doubled (I let mine rise for about 75 minutes in a slightly warm oven, though it might take only 45 minutes)

Bake at 350 degrees F for 20 to 25 minutes, or until golden brown.
Serve upside down, so the caramel and pecans are on top

Monday, January 15, 2007

New Years Resolutions are to blame for my outdated blog.

I have realized that cooking, though I enjoy it, is the enemy in keeping up with housework.

So, meet my new best friend, T Marzetti's Asian Ginger salad dressing. As a salad dressing, its not that great, but I have found it to be a versatile chicken marinade. I add a little bit of fresh ginger with the dressing and marinade chicken for as little as a couple of hours or overnight. I have been using it to top Won-Ton Chicken salad, sticking it on skewers with red peppers and grilling it, or if I forget to marinade it, I just put some chicken peices in a pan with this dressing, ginger, and peppers for a stir-fry to be served over rice.

It is so easy to make and, more importantly for me, easy to clean up!

Instead of cooking, I am trying to make my new hobby working out.

we'll see about that.

Anyway, mytastebuds really miss the variety in my dinners. If anybody has quick and easy dinner ideas, feel free to post them in the comments section! We could use a few more in the rotation.
 Posted by Picasa
Friends, it has been too long since I last blogged on the glutton.

And sadly, my entries might continue to be sparse.

This is a picture of our breakfast a couple of weeks ago: banana bread french toast with berry topping and whipped cream. Toni told me about this delicious dish and it was as good as she described (very good).

I used Mark Bittman's banana bread recipe from How to Cook Everything , I won't post the recipe because it wasn't my favorite and I don't want to get in trouble. The banana bread has coconut in it, which I thought was nice and it went well with the berries.

So use your favorite banana bread recipe, make french toast out of it, and warm some frozen mixed berries in a small pot with a bit of sugar, and a dash of salt for a topping. It's delicious!

 Posted by Picasa

Monday, December 11, 2006

what? a vegetable?

It's unlike me to get this excited about asparagus. This is my new favorite way to cook it. With 1/2 a stick of butter and a couple of cloves of garlic in the ingredients, what's not to get excited about?

Pan-Fried Asparagus
from kim at Allrecipes.com

1/4 C butter
2 T olive oil
1 t coarse salt
1/3 t ground black pepper
3 cloves of garlic
1/2 pound fresh aspargus spears, trimmed (just hold asparagus and bend the thick end until it breaks. It will break at just the right spot.)

melt butter in a skillet over medium-high heat. stir in olive oil, salt, and pepper. cook garlic in butter for a minute, but do not brown. Add asparagus, and cook for 10 minutes, or until tender, turning asparagus to ensure even cooking. Posted by Picasa

Thursday, December 07, 2006

These little truffles are a long time coming. After several tries, I finally created a coconut truffle that fit my requirement of a smooth, fluffy, filling with no coconut chunks.

This is my attempt to duplicate a truffle I used to buy on occasion at Gertrude Hawk, a local chocolatier. It was a coconut truffle under the "Gertrude's Best" line. Now it is only sold in boxes with other flavors that I don't particularly want, like mocha and peanut butter. So I had to make my own.

Then, since I misplaced the paper where I wrote the ingredient amounts, I tried to duplicate it. This is the result of the duplication, which actually wasn't a duplication at all. The filling was not fluffy this time around. Maybe it is because the first time I used good quality Lindt white chocolate, next time I tried Nestle Baking white chocolate. I liked the fluffy better, but ryan liked these smooth creamy truffles better. These were definitely harder to work with, so they aren't so perfectly shaped. If only I had a truffle mold. Also, with a softer filling, it was easier to roll them in almonds and then dip them in chocolate so that the filling didn't melt away in the chocolate.Any way I make them, I eat lots of truffles, so here's the recipe. I found it addicting.oh yeah, and it really isn't that time consuming to make though the recipe looks long.


Glorified Almond Joy Truffles

6 oz white chocolate (don't use white chocolate chips or low quality white chocolate. make sure it has cocoa butter in it)
1/2 C plus 1 T heavy cream
1 and 1/8 t coconut flavoring (or to taste)
1 C finely chopped almonds
10 oz chocolate for dipping (dark or light) More if you want to do 2 coats. I did only one, but it would probably be prettier and tastier with 2.

Finely chop white chocolate and put in a medium bowl.

Pour cream into a small saucepan and heat over medium heat. When it just comes to a boil remove from heat and pour over white chocolate. Stir until melted. Now you have a white chocolate ganache.

Add the coconut flavoring and stir. You might want more or less flavoring than I used.

Cool ganache until it feels cooler than room temperature. You can just stick it in the fridge, and stir it occasionally, or put it in an ice water bath and stir.

When ganache is cooled, whip it. Whip it good. The first batch I made whipped up until it was stiff enough to make little truffle balls with my hands. The second batch wouldn't whip up quite as high. So whip to your liking- until it is merely frothy, or keep whipping until it is stiff enough to make little truffle centers. If you want a softer center, then you will have to then freeze the ganache in order for it to be the right consistency to roll the truffle centers (or use a melon baller).

So roll little balls of whipped ganache into balls for truffle centers. Put them in a dish in the freezer for 30 minutes.

meanwhile, chop the dark or milk chocolate into little peices and place them in a small glass or metal bowl.

Boil a little bit of water in a small saucepan. Place the bowl of chocolate on top of the saucepan so that the bowl is sitting on top of it. It should not touch the water at all. now turn off the heat and stir constantly until chocolate is melted.

Prepare wax paper with a thin layer of nonstick spray, so truffles will not stick while they harden.

Roll frozen balls of ganache in almonds and press the almonds into the ganache. Immediately dip in chocolate, using a fork so excess chocolate can drip off. Place each truffle on wax paper until cooled.

store in the fridge or freezer.  Posted by Picasa

Monday, November 20, 2006

The knob on my old oven, when turned to choose the baking temperature, is correct if you turn it left to right. If you turn it right to left, it is about 100 degrees too hot.

This, my friends, is what happens when you try to bake Lucky 32 Sour Cream Apple Pie at 450 instead of 350 degrees.
yes, the picture is blurry. but I think you get the idea.

Since the pie was unfit to bring to the birthday celebration I made it for, it has been sitting on my counter all day. I find all pies irresistable, so despite it's tarry edges, this pie is almost half gone.

The recipe is usually a good one. I like it. If you use apples other than granny smith, then cut down on the sugar. I used a jonagold/granny smith mixture in the tar pie, and I cut the sugar in half.

Also, note that this pie is baked in a 10-inch springform pan. I would put a jellyroll pan underneath, as the pie might overflow and then the juices will be forever burned in the bottom of your oven.


Lucky 32 Sour Cream Apple Pie

1 ¼ cups sour cream
2 eggs
1 ½ cups sugar
2 ¼ tsp vanilla
1/3 tsp salt
2 Tbls flour
2 ¼ lbs Granny Smith Apples
1 recipe pie dough
1 ½ cups apple pie topping
¼ lb butter

topping:
½ cup flour
2 oz. walnut pieces
1/3 cup brown sugar
1 Tbls cinnamon

Preheat oven to 350. Combine sour cream and eggs in large mixing bowl and whip until creamy. Add sugar, vanilla, salt and flour and blend thoroughly. Core and slice the apples directly into sour cream mixture. Toss apples to coat well. Place dough in a 9” springform cake pan. Using fingers, press dough gently until pan is evenly covered and smooth. Add sour cream apple mixture into pan. Spread topping (described below) evenly over the top of the pie. Cut butter into pats and place over the top of pie. Bake in preheated 350 oven for 2 hours and 20 minutes. (Pie may be frozen and served later.)

Topping: combine flour, brown sugar, walnuts, cinnamon in the bowl of a food processor. Blend until ingredients are crumbled.
Posted by Picasa

Saturday, November 18, 2006

I haven't posted any recipes recently. That's because I haven't been making as many new recipes, and also because I noticed a correlation between the number of new recipes I make/post and the number I see on the scale. It's unfortunate.

Anyway, I have been trying to create just the right coconut truffle for this month's sugar high friday. Since these truffles were good, but not just right, I am posting them before the actual event. Like I said, they were good. But the texture was not quite as smooth as I was hoping. I am actually only posting them because I am embarrassed about the quality of food photography thus far on The Glutton. I am hoping to bring up the average grade here. I spent some time last week with the camera. Hurray for manual focus and natural lighting!

I made the truffles with chocolate ganache made with coconut milk instead of cream. Then I whipped the ganache after it cooled, made little truffles and dipped them in dark chocolate. oh yeah, don't forget to roll them in almonds. That was the best part!  Posted by Picasa

Friday, November 10, 2006

to see more of Kimmy's fantastic aprons, visit http://www.kimchiandolives.blogspot.com/


Posted by Picasa

Monday, November 06, 2006


I sense that some of you still haven't baked Supernatural Brownies. There is only one good excuse for that- no good semi-sweet or bittersweet chocolate with which to make them. well, get some.

Heed the call of the supernatural.